Is verbosity helpful when designing app screens?

Apologies for the lengthy absence from posting on here.  Now that I have grown my HR Partner team a little, I have some spare time on my hands, plus some renewed motivation and energy to work on improving the system with them.

As a "programmer pretending to be a designer", I am always accused of making my applications screens just too verbose.  I tend to pepper the screen real estate with hints, tips and (what I think are) helpful snippets of information that will make the user's life easier.

Of course, when we did some real world UX testing a few months ago, I was astounded to see that most users simply didn't read the information presented to them, but instead would look for distinct CTA (call to action) links or buttons and try those out instead.

This has made me rethink my whole verbose strategy, and made me remove a lot of excess wording from many of our HR app's screens (with the able assistance and guidance of both my talented former and new UX designer).  Conceptually, this has been a hard thing for me to do - removing what I thought were helpful prompts, and replacing them with an image or single word link to our help pages.

However, there are some screens where detailed explanations ARE still necessary - mainly the screen which deals with importing a CSV file into HR Partner.  Seeing as this is a screen which a lot of our new users use, as well as the fact that we have absolutely no control over the layout and format of the CSV import file the customer supplies, I thought that some extra explanations at the bottom of the import screen may be useful to guide them to a pain free import process.

Here was the old explanation text at the bottom of the CSV import screen:

Screen Shot 2018-07-10 at 9.16.28 am.png

As you can see - very wordy.  But what niggled at my UX designer the most was that the explanations for Gender, Departments, Locations etc. were still fairly vague, and worse still, prompted them to leave the import screen and go to another screen in order to look at what the valid import options were.

What she suggested was that we actually present the valid options all on the one screen, which means that they can check and modify their import file without having to leave this app screen, and get the chance to be distracted or lose interest.

So, the new screen looks like:

Screen Shot 2018-07-10 at 9.09.45 am.png

Because categories such as Department or Employment Status only have about 5 or 6 items in them, it was no problem to actually list them out on this screen directly.  As a bonus, we also modified the import code to use some default values if the information supplied in the import file was missing or invalid.

We actually added more words to the mix, but I am hoping that in this instance, the extra information will help the user to create a better import file and have a better user experience at the end of the day.

Can you think of any other way we can improve on this? I'd love to hear your thoughts in the comments.


Racing Along - Building a Telemetry system using Crystal & RethinkDB

f1-david-acosta-allely-shutterstock-com-edit.jpg

Like most younger lads, I often dreamed of being a Formula 1 race car driver, and I have fond memories of watching the likes of Ayrton Senna, Alain Prost, Nigel Mansell etc. race around Adelaide in the late 80's.  The smell, action and romance of F1 always appealed to me.

Alas, my driving skills are barely passable on the public roads, so a race track is a far safer place without me hurling a one ton machine around it.  I have kept in touch with the technological advances within the competition though, and am amazed at how far it has come these days.  I distinctly remember Jackie Steward stopping the race commentary back in the 80's so we could hear one of the first radio transmissions between driver and engineer.  I think it was Alain Prost, and the quality of the transmission was so bad that no one could work out what Prost was saying.

Nowadays, a wealth of data is sent between race car and the engineers in the pit wall, and even to the main team HQ across the other side of the world - who often know the health of the car far better than the driver piloting it at 300km/h.

Back to me.  I've been vicariously working out my lost race driver frustrations on Codemaster's F1 games for the past few years, which are quite realistic, with better graphics and simulation each year.  I only recently found out that Codemasters actually supplies a telemetry feed from their game via UDP, in real time.  I was excited to see so many third party vendors creating apps and race accessories that use this feed (e.g. steering wheels with speed, engine rev and gear displays on them).

Last weekend I thought to myself - "Why don't I try and create a racing telemetry dashboard? The kind that the race engineers or the team engineers back in HQ would use?".  Could I in fact, create a real time dashboard that ran on a web browser and could let someone on the other side of the world watch my car statistic in real time as I blasted around a track?

Well, lets start with the F1 2017 game itself.  It can send a UDP stream to a specific address and port, or just broadcast the stream on a subnet on a specific port.  The secret is to try and latch on to that stream, and either store it, or preferably send it on to another display in real time.

The question was, what technology could I use to grab this UDP feed?  Well, I have recently been dabbling with a new language called Crystal.  It is very similar to Ruby, which I have been using on all my web apps in the past few years, however instead of being an interpreted language, it is compiled, which gives it blazing speed.

Speed is the key here (and not only on the track).  The UDP data is transmitted at anything from 20 to 60Hz.  A typical 90 second race lap could see anything from 1500 to 4000 packets of data sent across.

I decided that I would need to do two things - capture that stream of data into a database for later historical reporting, AND also parse and send this data along to any web browsers that were listening, which meant I had to use a constant connection system like Websockets.  Now, the other bonus is that Crystal's Websocket support is top class too!

So what I did was to write a small (about 150 lines) Crystal app that could do this.  I ended up using the Kemal framework for Crystal, because I needed to build out some fancy display screens etc., and Kemal brings all the MVC goodies to the Crystal language.

Straight away, I came across the first problem I would encounter with trying to consume a constant stream of telemetry data.  Codemaster's sends the data as a packet of around 70 Float numbers.  Luckily, they document what the numbers indicate on their forums, but I have to firstly, consume the packet, then parse the packet to extract the bits of data I need from it (i.e. the current gear selected, the engine revs, the brake temperatures for each of the 4 tyres etc.), then I need to store that information in RethinkDB (which is one of my favourite NoSQL systems out there today), and THEN send the (parsed) packet data to any listening web browser who had an active websocket connection.  Whew.

But really, the actual core lines of code to that took only about 20 lines (excluding the parsing of the 70 odd parameters.  How could I do this effectively?  Well, Crystal has a concept of multi threading, or, multiple Fibers to use their terminology.  I would simply consume the incoming UDP packets on one fiber, then spawn another thread to do the parsing, saving and handing off of the data to the websocket!  It worked beautifully.

Here is a shortened version of the core code that does this bit:

SOCKETS = [] of HTTP::WebSocket
raw_data = Bytes.new(280)

# fire up the UDP listener
puts "UDP Server listening..."
server = UDPSocket.new
server.bind "0.0.0.0", 27003
udp_active = false

# now connect to rethinkdb
puts "Connecting to RethinkDB..."
conn = r.connect(host: "localhost")

def convert_data(raw_data, offset)
  pos = offset * 4
  slice = {raw_data[pos].to_u8, raw_data[pos+1].to_u8, raw_data[pos+2].to_u8, raw_data[pos+3].to_u8}
  return pointerof(slice).as(Float32*).value.to_f64
end

ws "/telemetry" do |socket|
  # Add this socket to the array
  SOCKETS << socket
  # clear out any old data collected in the UDP stream
  server.flush
  puts "Socket server opening..."
  udp_active = true
  
  socket.on_close do
    puts "Socket closing..."
    SOCKETS.delete socket
    # Stop receiving the UDP stream when the last socket closes
    udp_active = false if SOCKETS.empty?
  end

  spawn do
    while udp_active
      bytes_read, client_addr = server.receive(raw_data)
      telemetry_data["m_time"] = convert_data(raw_data, 0)
      telemetry_data["m_lapTime"] = convert_data(raw_data, 1)
      telemetry_data["m_lapDistance"] = convert_data(raw_data, 2)
      telemetry_data["m_totalDistance"] = convert_data(raw_data, 3)
      << SNIP LOTS OF SIMILAR CONVERSION LINES >>
      telemetry_data["m_last_lap_time"] = convert_data(raw_data, 62)
      telemetry_data["m_max_rpm"] = convert_data(raw_data, 63)
      telemetry_data["m_idle_rpm"] = convert_data(raw_data, 64)
      telemetry_data["m_max_gears"] = convert_data(raw_data, 65)
      telemetry_data["m_sessionType"] = convert_data(raw_data, 66)
      telemetry_data["m_drsAllowed"] = convert_data(raw_data, 67)
      telemetry_data["m_track_number"] = convert_data(raw_data, 68)
      telemetry_data["m_vehicleFIAFlags"] = convert_data(raw_data, 69)
      xmit = telemetry_data.to_json
      r.db("telemetry").table("race_data").insert(telemetry_data).run(conn)    
      begin
        SOCKETS.each {|thesocket| thesocket.send xmit}
      rescue
        puts "Socket send error!"
      end
    end
  end

end

NOTE: Port 27003 for the USP listening port.  27 was the late, great Ayrton Senna's racing number, and he won 003 World Driver's Championships in his time!

That is really the core of the system. The first few lines set up a UDP listener, and also the connection to RethinkDB.  Then there is a short routine I define which converts the incoming little endian FLOAT values to a big endian Float64 value that Crystal expects.  Then there is the Websocket listener which grabs the incoming packets, and spawns a fiber to process it when it comes in.

The rest of the system is a pretty basic Bootstrap based web site with 3 pages.  Oh yeah - Crystal serves up these web pages as well, along with customising sections via ERC templates.  Not bad for a single executable that is only around 2MB when compiled!

There is a Live page which uses a Websocket listener to stream the live data to various realtime moving FLOT graphs, as well as the car position on a track map:


Then there is a historical data page which allow the engineer to plot race data lap by lap for an already run race:

F1 Historic Telemetry.png

Then a Timing page which shows lap times extracted from the data stream:

F1 Lap Times.png

No space or time to go into those parts in detail here, so I might save those for another blog post.

My main intent with this post was to try and learn Crystal, and to see if I could build a robust and fast Websocket server.  Mission achieved.

I must say I had great fun using this system - I actually had my son play the game on our PS4 while I watched him on my iMac web browser from my office on a different floor of the house altogether.  I could even tell when he struggled on certain parts of the track (the game sends car position data in real time too), and I could see when he was over revving his engines or cooking his brakes trying to pass another car.  This was a 10/10 as far as a fun project goes, no matter the impracticality of it.


Building a face recognition app in under an hour

Over the weekend, I was flicking through my Amazon AWS console, and I noticed a new service on there called 'Rekognition'.  I guess it was the mangled spelling that caught my attention, but I wondered what this service was? Amazon has a habit of adding new services to their platform with alarming regularity, and this one slipped past my radar somehow.

So I dived in and checked it out, and it turns out that in late 2016, Amazon released their own image recognition engine on their platform.  It not only does facial recognition, but general photo object identification too.  It is still fairly new, so the details were sketchy, but I was immediately excited to try it out.  Long story short, within an hour, I had knocked up a quick sample web page that could grab photos from my PC camera and perform basic facial recognition on it.  Want to know how to do the same? Read on...

I had dabbled in facial recognition technology before, using third party libraries, along with the Microsoft Face API, but the effort of putting together even a rudimentary prototype was fraught with complexity and a steep learning curve.  But while browsing the Rekognition docs (thin as they are), I realised that the AWS API was actually quite simple to use, while seemingly quite powerful.  I couldn't wait, and decided to jump in feet first to knock up a quick prototype.

The Objective

I wanted a 'quick and dirty' single web page that would allow me to grab a photo using my iMac camera, and perform some basic recognition on the photo - basically, I wanted to identify the user sitting in front of the camera.

The Amazon Rekognition service allows you to create one or more collections.  A collection is simply a, well, collection of facial vectors for sample photos that you tell it to save.  NOTE: The service doesn't store the actual photos, but a JSON representation of measurements obtained from a reference photo.

Once you have a collection on Amazon, you can then take a subject photo and have it compare the features of the subject to its reference collection, and return the closest match.  Sounds simply doesn't it?  And it is.  To be honest, coding the front end of this web page to get the camera data actually took longer than the back end to perform the recognition - by a factor of 3 to 1 !!

So, in short, the web page lets you (1) create or delete a collection of facial data on Amazon, (2) upload face data via a captured photo to your collection, and (3) compare new photos to the existing collection to find a match.

Oh, and as a tricky extra (4), I also added in the Amazon Polly service to this demo so that after recognising a photo, the page will broadcast a verbal, customised greeting to the person named in the photo!

The Front End

My first question was what library to use to capture the image using my iMac camera.  After a quick Google search, I found the amazing JPEG Camera library on GitHub by amw, which allows you to use a standard HTML5 canvas to perform the capture, or fallback to a Flash widget for older browsers.  I quickly grabbed the library, and modified the example javascript file for my needs.

The Back End

For the back end, I knocked up a quick Sinatra project, for a lightweight Ruby based framework that could do all the heavy lifting with AWS.  I actually used Sinatra extensively (well, Padrino actually) to build all my web apps, and highly recommend the platform.

Note: Amazon Rekognition example actually promote uploading the source photos used in their API to an Amazon S3 bucket first, then processing them.  I wanted to avoid this double step and send the image data directly to their API instead, which I managed to do.

I also managed to do a similar thing with their Polly greeting.  Instead of saving the audio to an MP3 file and playing that, I managed to encode the MP3 data directly into an <audio> tag on the page and play it from there!

The Code

I have placed all the code for this project on my GitHub page.  Feel free to grab it, fork it and improve it as you like.  I will endeavour to explain the code in more detail here.

The Steps

First things first, you will need an Amazon AWS account.  I won't go into the details of setting that up here, because there are many articles you can find on Google for doing so.

Creating an AWS IAM User

But once you are set up on AWS, the first thing we need to do is to create an Amazon IAM (Identity & Access Management) user which has the permissions to use the Rekognition service.  Oh, we will also set up permissions for Amazon's Polly service as well, because once I got started on these new services, I could not stop.

In the Amazon console, click on 'Services' in the top left corner, then choose 'IAM' from the vast list of Amazon services.  Then, on the left hand side menu, click on 'Users'.  This should show you a list of existing IAM users that you have created on the console, if you have done so in the past.

Click on the 'Add User' blue button on the top of this list to add a new IAM user.

Give the user a recognisable name (more for your own reference), and make sure you tick 'Programmatic Access' as you will be using this IAM in an API call.

Next is the permissions settings.  Make sure you click the THIRD box on the screen, that says 'Attach existing policies directly'.  Then, on the 'Filter: Policy Type' search box below that, type in 'rekognition' (note the Amazonian spelling) to filter only the Rekognition policies. Choose 'AmazonRekognitionFullAccess' from the list by placing a check mark next to it.

Next, change the search filter to 'polly', and place a check mark next to 'AmazonPollyFullAccess'.

Nearly there.  We now have full permission for this IAM for Amazon Rekognition and Amazon Polly.  Click on 'Next: Review' on the bottom right.

On the review page, you should see 2 Managed Policies giving you full access to Rekognition and Polly.  If you don't, go back and re-select the policies again as per the previous step.  If you do, then click 'Create User' on the bottom right.

Now this page is IMPORTANT.  Make a note of the AWS Key and Secret that you are given on this page, as we will need to incorporate it into our application below.  

This is the ONLY time that you will be shown the key/secret for this user, so please copy and paste the info somewhere safe, and download the CSV file from this page with the information in it and keep it safe as well.

Download the Code

Next step, is to download the sample code from my GitHub page so you can modify it as necessary.  Go to this link and either download the code as ZIP file, or perform a 'git clone' to clone it to your working folder.

First thing you need to do is to create a file called '.env' in your working folder, and enter these two lines, substituting your Amazon IAM Key and Secret in there (Note: These are NOT real key details below):

export AWS_KEY=A1B2C3D4E5J6K7L10
export AWS_SECRET=T/9rt344Ur+ln89we3552H5uKp901

You can also just run these two lines on your command shell (Linux and OSX) to set them as environment variable that the app can use.  Windows user can run them too, just replace the 'export' prefix with 'set'.

Now, if you have Ruby installed on your system (Note: No need for full Ruby on Rails, just the basic Ruby language is all you need), then you can run

bundle install

to install all the pre-requisites (Sinatra etc.), then you can type

ruby faceapp.rb

to actually run the app.  This should start up a web browser on port 4567, so you can fire up your browser and go to 

http://localhost:4567

to see the web page and begin testing.

Using the App

The web page itself is fairly simple.  You should see a live streaming image on the top center, which is the feed from your on board camera.

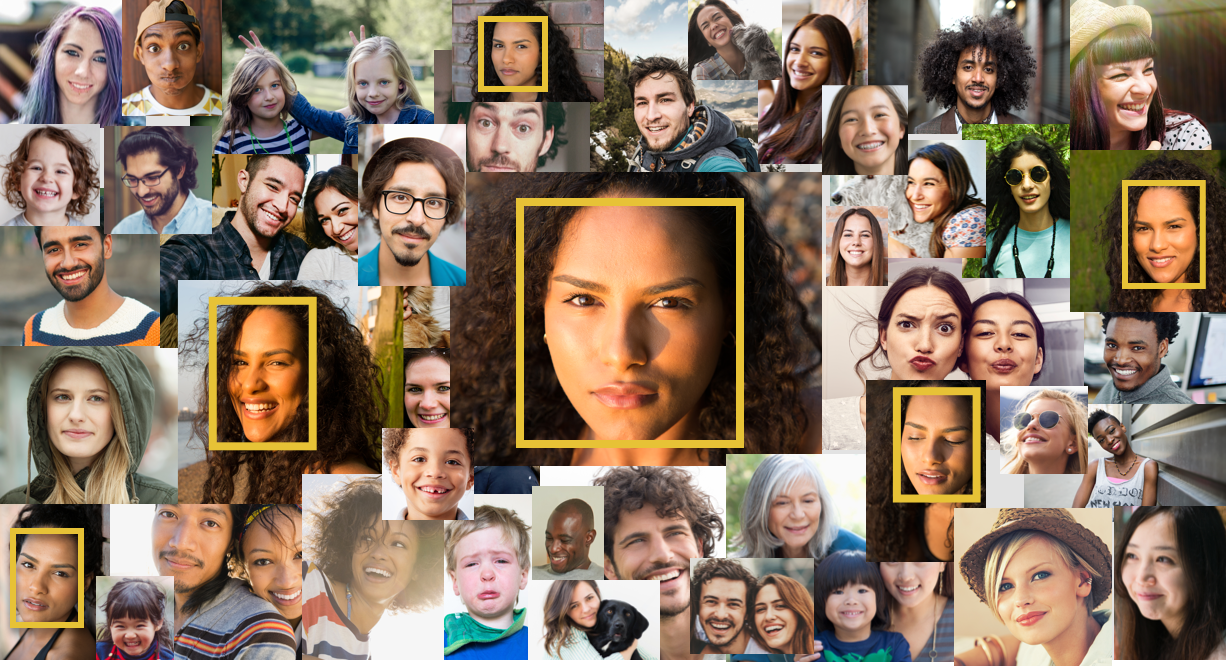
The first thing you will need to do is to create a collection by clicking the link at the very bottom left of the page.  This will create an empty collection on Amazon's servers to hold your image data.  Note that the default name for this collection is 'faceapp_test', but you can change that on the faceapp.rb ruby code (line 17).

Then, to begin adding faces to your collection, ask several people to sit down in front of your PC or table/phone, and make sure their face is in the photo frame ONLY (Multiple faces will make the scan fail).  Once ready, enter their name in the text input box and click the 'Add to collection' button.  You should see a message that their facial data has been added to the database.

Once you have built up several faces in your database, then you can get random people to sit down in front of the camera and click on 'Compare image'.  Hopefully for people who have been already added to the collection, you should get back their name on screen, as well as a verbal greeting personalised to their name.

Please note that the usual way for Amazon Rekognition to work is to upload the JPEG/PNG photo to an Amazon S3 Bucket, then run the processing from there, but I wanted to bypass that double step and actually send the photo data directly to Rekognition as a Base64 encoded byte stream.  Fortunately, the aws-sdk for Ruby allows you to do both methods.

Lets walk through the code now.

First of all, lets take a look at the we page raw HTML itself.

https://github.com/CyberFerret/FaceRekognition-Demo/blob/master/views/faceapp.erb

This is a really simple page that should be self explanatory to anyone familiar with HTML creation.  Just a series of names divs, as well as buttons and links.  Note that we are using jQuery, and also Moment.js for the custom greeting.  Of note is the faceapp.js code, which does all the tricky stuff, and the links to the JPEG camera library.

You may also notice the <audio> tags at the bottom of the file, and you may ask what this is all about - well, this is going to be the placeholder for the audio greeting we send to the user (see below).

Let's break down the main app js file.

https://github.com/CyberFerret/FaceRekognition-Demo/blob/master/public/js/faceapp.js

This sets up the JPEG Camera library to show the camera feed on screen, and process the upload of the images.

The add_to_collection() function is straightforward, in that it takes the captured image from the camera, then does a post to the /upload endpoint along with the user's name as the parameter.  The function will check that you have actually entered a name or it will not continue, as you need a short name as a unique identifier for this facial data.

The upload function simply checks that the call to /upload finished cleanly, and either displays a success message or the error if it doesn't.

The compare_image() function is what gets called when you click the, well, 'Compare image' button.  It simply grabs a frame from the camera, and POSTs the photo data to the /compare endpoint.  This endpoint will return either an error, or else a JSON structure containing the id (name) of the found face, as well as the percentage confidence.

If there is a successful face match, the function will then go ahead and send the name of the found face to the /speech endpoint.  This endpoint calls the Amazon Polly service to convert the custom greeting to an MP3 file that can be played back to the user.

The Amazon Polly service returns the greeting as a binary MP3 stream, and so we take this IO stream and BaseEncode64 it, and place it as an encoded source link in the <audio> placeholder tags on our web page, which we can then do a .play() on the element in order to play the MP3 through the user's speakers using the HTML5 Web Audio API.

This is also the first time I have placed encoded data in the audio src attribute, rather than a link to a physical MP3 file, and I am glad to report that it worked a treat!

Lastly on the app js file is the greetingTime() function.  All this does is work out whether to say 'good morning/afternoon/evening' depending on the user's time of day.  A lot of code for something so simple, but I wanted the custom greeting they hear to be tailored to their time of day.

Lastly, lets look at the Ruby code for the Sinatra app.

https://github.com/CyberFerret/FaceRekognition-Demo/blob/master/faceapp.rb

Pretty straightforward Sinatra stuff here.  The top is just the requires that we need for the various AWS SDK and other libraries.

Then there is a block setting up the AWS authentication configuration, and the default collection name that we will be using (which you can feel free to change).

Then, the rest of the code is simply the endpoints that Sinatra will listen out for.  It listens for a GET on '/' in order to display the actual web page to the end user, and it also listens out for POST calls to /upload, /compare and /speech which the javascript file above posts data to.  Only about 3 or 4 lines of code for each of these endpoints to actually carry out the facial recognition and speech tasks, all documented in the AWS SDK documentation.

That's about all that I can think of to share at this point.  Please have fun with the project, and let me know what you end up building with it.  Personally, I am using this project as a starting block for some amazing new features that I would love to have in our main web app HR Partner.

Good Luck, and enjoy your facial recognition/speech synthesis journey.


TopHN - A fun side project built with Vue.js and RethinkDB

TopHN running in a side window so I can see news bubbling up and down in real time while I work away... (Yes, what you see is some actual code from the project - don't laugh!).

TopHN running in a side window so I can see news bubbling up and down in real time while I work away... (Yes, what you see is some actual code from the project - don't laugh!).

Over the past couple of years, I have tried to push my ageing brain constantly, and one of the best ways I've found to do that is to try and learn a new programming language, framework or methodology every month or so, just to keep the skills sharp.

I've always had a love/hate relationship with NoSQL databases, having cut my teeth for many decades on pure SQL systems, so I wanted to get my hands dirty with that.  I've also struggled a little bit to get to grips with Javascript front end frameworks, and wanted to improve my skill sets in that area.

So this past weekend, I decided to get 'down and dirty' with Vue.js as well as RethinkDB.  There is a lot of good natured banter amongst programmers about React vs Vue vs Angular etc. and I wanted to see for myself which one would suit my programming style better.  I had already done a lot of work in Angular v1 with my mobile app development (using Cordova and Ionic), and wanted to see if Angular v2 and the other frameworks I mentioned would be an easy transition.

Long story short, I had a bit of trouble getting my head around Angular v2, as well as React.  At the end of the day, Vue.js just seemed more natural, and possibly closer to Angular v1 to me, and I found myself being able to understand concepts and start knocking together a basic app within short order.

RethinkDB has also been in the news lately, with their parent company shutting down, although the database itself looks like it will live on as open source.  I've always liked the look of the RethinkDB management console, as well as the ease of installation on various platforms, so I decided to install it on my development Mac and give it a go.

The Project

The big question is - what to build?  I wanted to build something actually useful, instead of just another throwaway project.  Then, one day last week while I was browsing around Hacker News, it hit me.

Now, I love browsing Hacker News, and catching up with the latest tech articles, but one of the things that I found myself repeatedly doing was (a) refreshing the main 'Top News' screen every few minutes to see what people were talking about, and what had made its way to the Top 30, and (b) checking the messages that I had personally posted recently, to see if there were any replies to them, and (c) constantly checking my Karma balance on the top of the screen to see if there had been a mass of up or downvotes to anything I had posted.

These three things seemed to be my primary activities on the site (apart from reading articles), so I decided to see if I could build a little side project to make it easier.  So TopHN was born!

What is TopHN in a nutshell? Well, it is basically a real time display of top news activity on your web screen.  To be fair, there are already a LOT of other Hacker News real time feeds available out there, many which are far better than mine - but I wanted my solution to be very specific.  Most of the others display comments and other details, but I wanted my solution to be just a 'dashboard' style view of the top, important stuff that was relevant to me (and hopefully most other users too).

First things first, I decided to take a look at the HackerNews API.  I was excited to see that this was based on Google's Firebase.  I had used Firebase in a couple of mobile programming jobs 2 years ago, and really loved the asynchronous 'push' system they used to publish changes.  I debated whether to use the Firebase feed directly, but decided that No, because I was going to be doing some other manipulation and polling of data, that I didn't want to clutter up the Firebase feed directly with more poll requests, but instead would try and replicate the HN data set in RethinkDB.

So I went ahead and set up a dedicated RethinkDB server in the cloud.  This was a piece of cake following their instructions.  One the same server, I built a small Node.js app (only about 30 lines of code), whose sole purpose was to listen to the HN API feed from Firebase, and grab the current data and save a snapshot of them in my RethinkDB database.

Hacker News actually publishes some really cool feeds - every 30 seconds or so, a list of the top 500 articles are pushed out to the world as a JSON string.  Also, they have a dedicated feed which pushes out a list of changes made every 20 to 30 seconds.  This includes a list of article and comment ids that have been changed or entered in their system, as well as the user ids of any users who had changed their status (i.e. made profile changes, or had their karma increased/decreased by someone, or posted a comment etc.).

I decided to use these two feeds as the basis for building my replicated data set.  Every time the 'Top 500' feed would be pushed out, I would grab the id's of the articles, have a quick look in RethinkDB to see if they already existed, and if they didn't, I would go and ask for the missing articles individually, and plop those in RethinkDB.  After a few days of doing this, I ended up with tens of thousands of articles in my database.

I would also sniff out the 'changes' feed, and scan the articles in there to see if I already had them, and copy them if not.  Same with the users.  Every time a user was mentioned in the 'changes' feed, I would grab their updated profile and save in RethinkDB.

The screenshot above shows the RethinkDB management console, a really cool tool for checking server performance, as well as testing queries and managing data tables and shards.

So far so good.  The replicated database was filling up with data every few seconds.  Now, the question was - What to do with it?

I was excited to see that RethinkDB also had a 'changes()' feature, which would publish data changes as they happened.  But unlike the Firebase tools, these weren't client side only tools, and needed some sort of server platform to engage the features.  So what I decided on, was to use another Node.js app as the server back end, and use Vue.js as the front end for the interface elements.

I would also need to build a connection between the two using socket.io.  I was a bit disappointed that there didn't seem to be any native way to push/pull the changes from server to client without it, but hey - we are all about learning new things, and building a socket driven app was certainly something I hadn't done before (at least not from scratch).

So, end of the day, this second Node.js app would sit on a different server, and and wait for a user to visit the site.  Now, users can do a couple of things.  They can simply visit the top level URL of the site, and just see the Top 30 feed in real time.  And I mean nearly real time.  As new articles are published, or they move up and down the Top 30, the page view will bubble them up and down and show the latest scores and comment counters.

If the user elected to enter in their HN username, the page would additionally also display the user's Karma balance in real time, along with a notation for how much it has changed in the last couple of minutes.  Nothing like vanity metrics to keep people excited!

Also, if their username is entered, the page will show their last 10 or so comments and stories they published, so they can keep an eye on any responses to comments etc.

The second Node.js server is essentially a push/pull server.  It will silently push Top 30 list changes to all web browsers connected to it.  AND it will also set up a custom push event handler for any browsers where the user has specified their username.  As you can expect, this take a bit of management, and server resources, so I hope I never get to experience the HackerNews 'hug of death' where a bunch of people log on at the same time, because I am not really sure of how far this will scale before it comes to a screaming halt.

The Vue.js components purely sit there and listen for JSON data packets from the server pushes, and then format them accordingly and display them on the web page without having to refresh.

I haven't gone into the nutty details of how I built this on here, but if there is any interest and I get lots of requests, then I am open to publishing some code snippets and going into deeper detail of how I built the various components.

All in all, I am pretty happy with what amounted to around 4 or 5 days of part time coding.  I think this is a useful tool, and as you can see from the header image, I tend to have a narrow Chrome window open off to the side so I can keep an eye on news happenings and watch them bubble up and down.  The web page is also totally responsive, and should work on most mobile browsers for portability.

Are you a Hacker News member? Why not check out https://tophn.info and let me know what you think?