


Photo by BENCE BOROS on Unsplash
As a startup founder of an HR SaaS called HR Partner, I found myself being ‘on call’ virtually 24/7. I had hundreds of customers in countries all over the world, and this resulted in my email and support centre notifications going off around the clock.
Probably the best thing I ever did for my sanity was to turn on ‘Scheduled DND (Do Not Disturb)’ on my iPhone between the hours of 10pm and 6am. I could finally get some decent sleep. (Note: The second best thing I did was to hire a great support team to take care of customer tickets during that time).
However, some of those notifications were generated from our AWS monitoring system, and were caused by critical events such as a server going down, or becoming unavailable due to a DDoS attack or similar. Because we don’t yet have a full DevOps or security team in place, I still deal with those incidents myself.
However, on the iPhone, DND is exactly that - a blanket ‘do not disturb’ which shuts off all notifications from all apps. That was, until iOS 12 came out, which included a feature which allowed ‘critical notifications’ to still get through.
But the problem with that was that critical notifications were deemed as being from government agencies or weather services, that had to send through important notifications about events that could be life threatening. Not all apps could have the ability to post critical notifications.
But then this week, I noticed that a third party notification app called Pushover was actually approved for sending critical notifications. This got me to thinking - could I send certain important event activity from AWS to myself using this service? The answer was YES, and it was quite simple to do so, using and AWS lambda function as the go between.
Here is how you can do it too.
Set up a Pushover account
Head on over to Pushover.net and set yourself up an account. You can stay on the free tier as long as you send less than 7500 messages per month. Seeing as I only expected about 2 or 3 messages per week, based on our normal activities, this is well under their limit and I can stay on the free tier forever.
The have an iPhone app that you will also need to download so you can receive notifications. The cost of this app is USD$5 (via in app purchase once your 7 day trial is over) which is a tiny price to pay for the convenience of critical notifications.
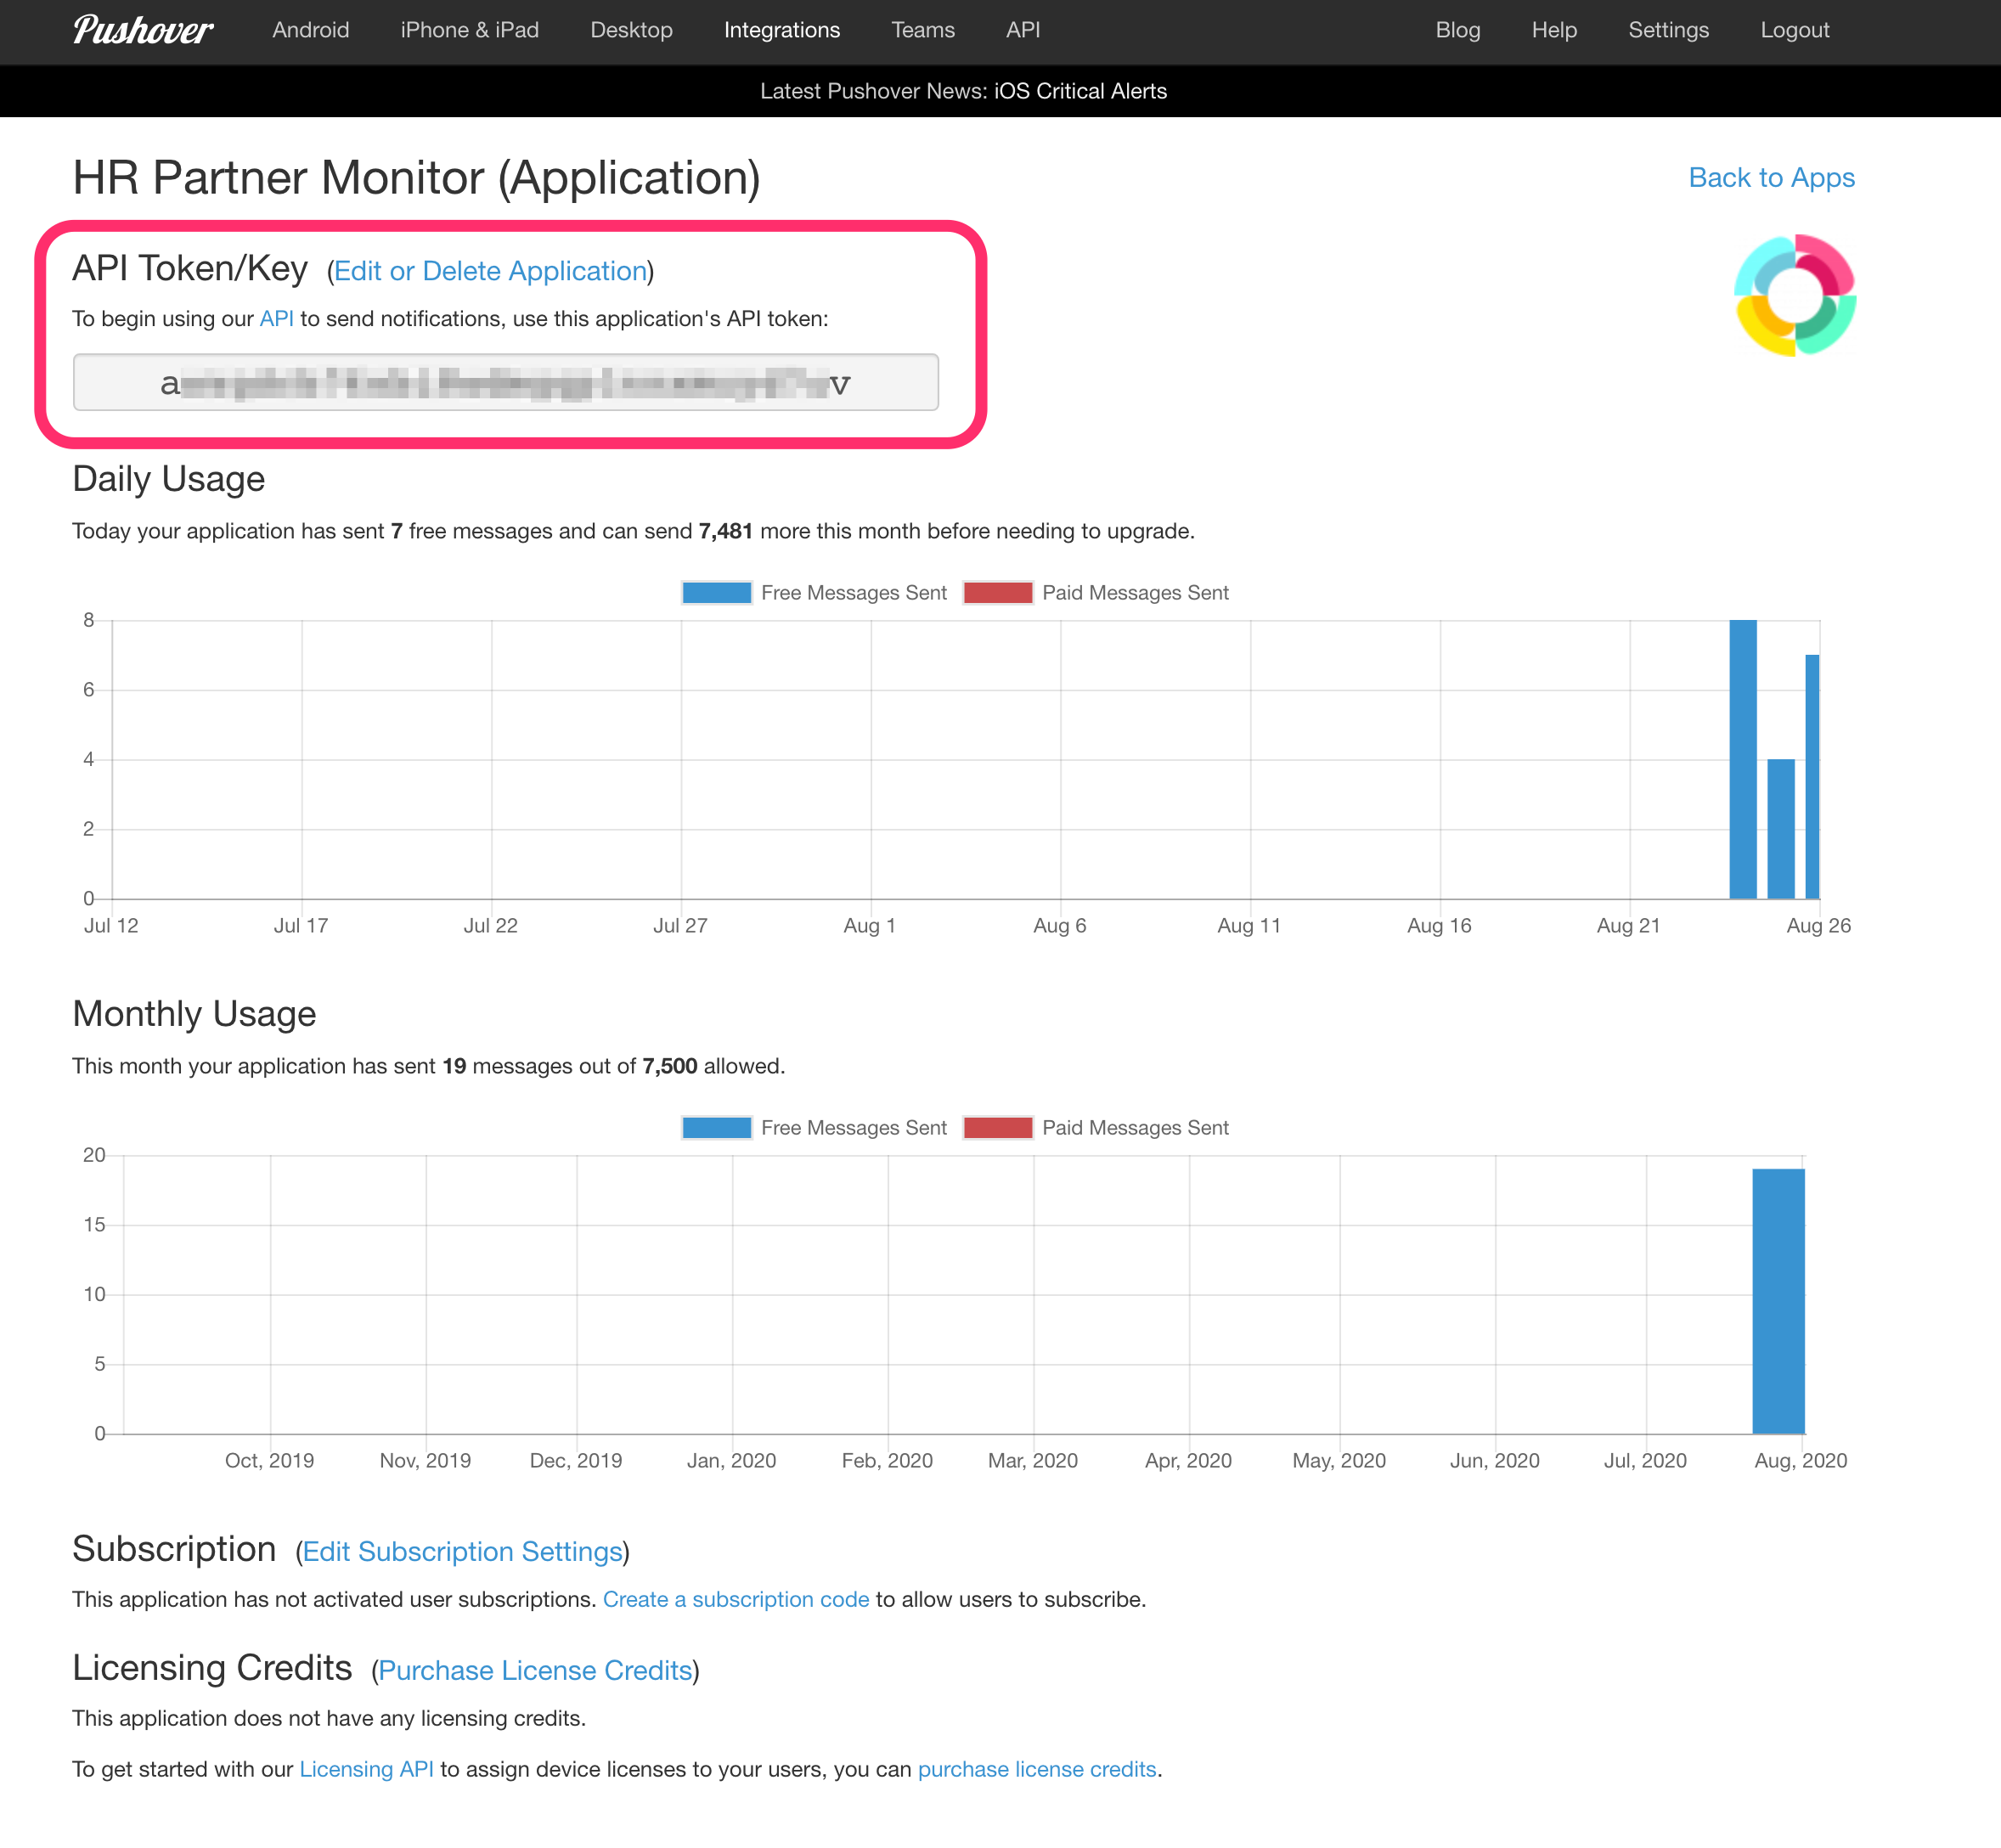
Once you set up an account, you will get a User Key, that you will need, and you will also have to set up an Application on the platform, which will give you an Application API Token, that you will also need for the integration steps below.

To get the application API token, you will need to click on the Application once you create it.
Create a Node.JS Project
Now we can create a small (talking about 20 lines of code) Node.js project which will handle the Pushover notifications from AWS. But wait, why are we creating the project locally first instead of just creating the code in AWS Lambda directly?
Well, the short answer is that we will be using a node module called ‘pushover-notifications’. This isn’t in the standard collection of modules that Lambda has access to, so we need to create the project offline, with all the requisite module dependencies, then ZIP and upload the package to Lambda.
So, create an empty folder on your local drive, and within that folder, run these two commands:
npm initnpm install pushover-notificationsAnd now, you can create a file called index.js in here, with the following contents:
var Push = require('pushover-notifications')

exports.handler = function(event, context) {

    var p = new Push( {
      user: process.env['PUSHOVER_USER'],
      token: process.env['PUSHOVER_TOKEN'],
    })

    var snsMessage = JSON.parse(event.Records[0].Sns.Message);

    var alertSubject = snsMessage.AlarmDescription;
    var alertMessage = snsMessage.NewStateValue + "\n" + snsMessage.NewStateReason + "\n" + snsMessage.Trigger.MetricName + " " + snsMessage.Trigger.Namespace;

    var msg = {
      title: alertSubject,
      message: alertMessage,
      priority: 2,
      retry: 30,
      expire: 300,
      url: "https://<link to rebbot server via API>",
      url_title: "Reboot Server"
    }

    p.send( msg, function( err, result ) {
      if ( err ) {
        throw err
      }
    })

};
And once saved, you can ZIP up the entire folder (including the ‘node_modules’ folder and others that may be automatically created in here) and keep the ZIP file aside for the next step.
To explain the code in more detail, the first line is just including the pushover-notifications module. Then the next bit called exports.handler is the standard function that AWS Lambda will call (with the SNS parameters passed in the event variable).
Next, we instantiate an instance of the Push() object called p, which is where we pass the Pushover API token and User token. Note: For security reasons, these tokens are stored as environment variables instead of being embedded within the code. You will need to set up these environment variables as part of setting up the Lambda function in the next section.
The next line after this just extracts the JSON stringified SNS notification details that are sent to the Lambda function from Amazon SNS and stores it in a variable called snsMessage.
Then we set up the subject and actual message body. These can be anything you like, but in this case, we are extracting the description and particular values that have been passed to us from SNS which contain things like the actual error text and service names etc.
Penultimately, we set up an object called msg which contains the packet of data to send to Pushover. This includes the subject and message body we created above, but more importantly, this also specifies the type of message. The priority variable is key. Normal messages are priority 0, but these messages are treated as non-urgent and won’t come through when DND mode is turned on on the phone.
Priority 1 messages are marked ‘critical’ and WILL come through, but priority 2 messages are deemed ‘critical’ AND will also persist until they are acknowledged by the recipient. THIS is the type of message I wanted - as the notifications are critical enough to warrant me responding to them and not just glancing and ignoring them.
For priority 2 messages, you also have to specify the retry period (which I set to 30 seconds) and the expire period (which I set to 5 minutes, or 300 seconds). This means that if I don’t acknowledge the message, it will keep pinging me every 30 seconds for up to 5 minutes. Long enough to wake me from a deep slumber at 2am!
At the bottom of this object, you can also specify a URL and a link name that gets sent with the notification. This is really useful, and I used it to embed a special link that our team has which will call an AWS API Gateway function to reboot the server(s) automatically. Perhaps I will detail how I set this up on another blog post in the future, but for now, lets just stick to the notifications.
Set Up A Lambda Function
Now we will need to set up a serverless function in AWS which will transmit certain SNS (Simple Notification Service) messages to Pushover.
This is all done quite simply and easily via your AWS console. Just choose the ‘Lambda’ function from the AWS ‘Services’ drop down

And in the next section click the ‘Create Function’ button.

Now we choose ‘Author from scratch’ and we give the function a meaningful name such as sendAlertToPushover, and we specify ‘Node.js 12.x’ as the Runtime engine, and click ‘Create Function’.

On the next screen, we won’t actually type in any code. Instead, we will replace the existing code by clicking on the ‘Actions’ button and selecting ‘Upload a .zip file’.

Specify the name of the ZIP file you created containing the Node.js project files that you created in the previous step. This will upload all the files to Lambda and show you the code in the editor window.
Don’t forget to scroll down a little and set up the environment variables that the project needs:

Ok, that should be all for this part of the setup.
Setting Up The SNS Service
Ok, nearly there. Now we need to set up the Amazon SNS (Simple Notification Service) which is the conduit that AWS uses to send messages from one service to another.
From the ‘Services’ menu in the AWS Console again, find the SNS service and select it.
Then in the SNS dashboard, choose ‘Topics’ from the left hand menu, and click on ‘Create Topic’.

Next, we need to give the topic a meaningful name, such as ‘criticalPushoverMessage’ or similar.
Once done, click on ‘Create Topic’ at the bottom of the screen (leave everything else as default for now).

Once you save this topic, you will be taken to this screen, where you can click ‘Create Subscription’ to tell AWS how to handle the topic messages.

And on the subscription creation screen, we need to change the ‘Protocol’ to ‘AWS Lambda’ and then on the ‘Endpoint’ we need to choose the Lambda function that we created in the step above.
Now we can click ‘Create Subscription’ at the bottom of the screen to save it.

That is it! You should see the following confirmation screen.

Make sure the ‘Status’ says Confirmed. If so, you are all set to go.
Choosing Messages To Send
So the last step on the AWS side of things is to specify which messages you want to send over to Pushover to wake you up.
Monitoring Elastic Beanstalk
In our case, we host our servers on Elastic Beanstalk, and this service has a monitoring console where we can set up Alerts which we can send through whenever any events occur ‘outside normal operations’ - these can be things like very high sustained CPU activity, or network traffic dropping to zero, or the server status switching to ‘Degraded’ or ‘Severe’.
In our case, we want to trigger an alarm when the server CPU hits more than 90% for 15 minutes straight, so from the Elastic Beanstalk Monitoring console, we simply click the little ‘bell’ icon on the top right of the ‘CPU Utilization’ graph.

Now on the next screen you can set up the parameters which will trigger the alarm:

Give this alert a meaningful name such as ‘mainServerHighCPU’. It is also a good idea to give it a meaningful description, as this description can be used on the Pushover notification itself.
Then you can specify the monitoring period - we will select 15 minutes, as that is the window that we would like to monitor for the high CPU activity. And we will specify >= 90% as the threshold to look for. Feel free to modify to suit your own needs.
The important thing is in the ‘Notify’ field, you pick the SNS Notification Topic that we set up in the previous step above. Also, you need to tick ‘Alarm’ in the last section as we only want notifications when things hit an ‘Alarm’ state, and not when they go back to ‘OK’ or when they have insufficient data. (You may actually want notification when things go back to normal, so you can select it if you want, but I don’t normally care if things are OK or unclear, only when they break).
That is it! When you click the ‘Add’ button, the alert will be created in Cloudwatch, and the SNS Topic we set up will be listening for any changes in this alert. As soon as the alert conditions are met, the details of the alert will be send to SNS, which will then pass it over to the Lambda function we created, which in turn will send it to Pushover, and to our phones!
Monitoring EC2
You can also create alerts directly on an EC2 instance if you are not using Elastic Beanstalk. They work in a similar way. Here you can go to your EC2 console, then choose an EC2 instance from the list, and click on the ‘Monitoring’ tab.

You can then click on the ‘Create Alarm’ button, and tell the system what sort of alarm you want to set:
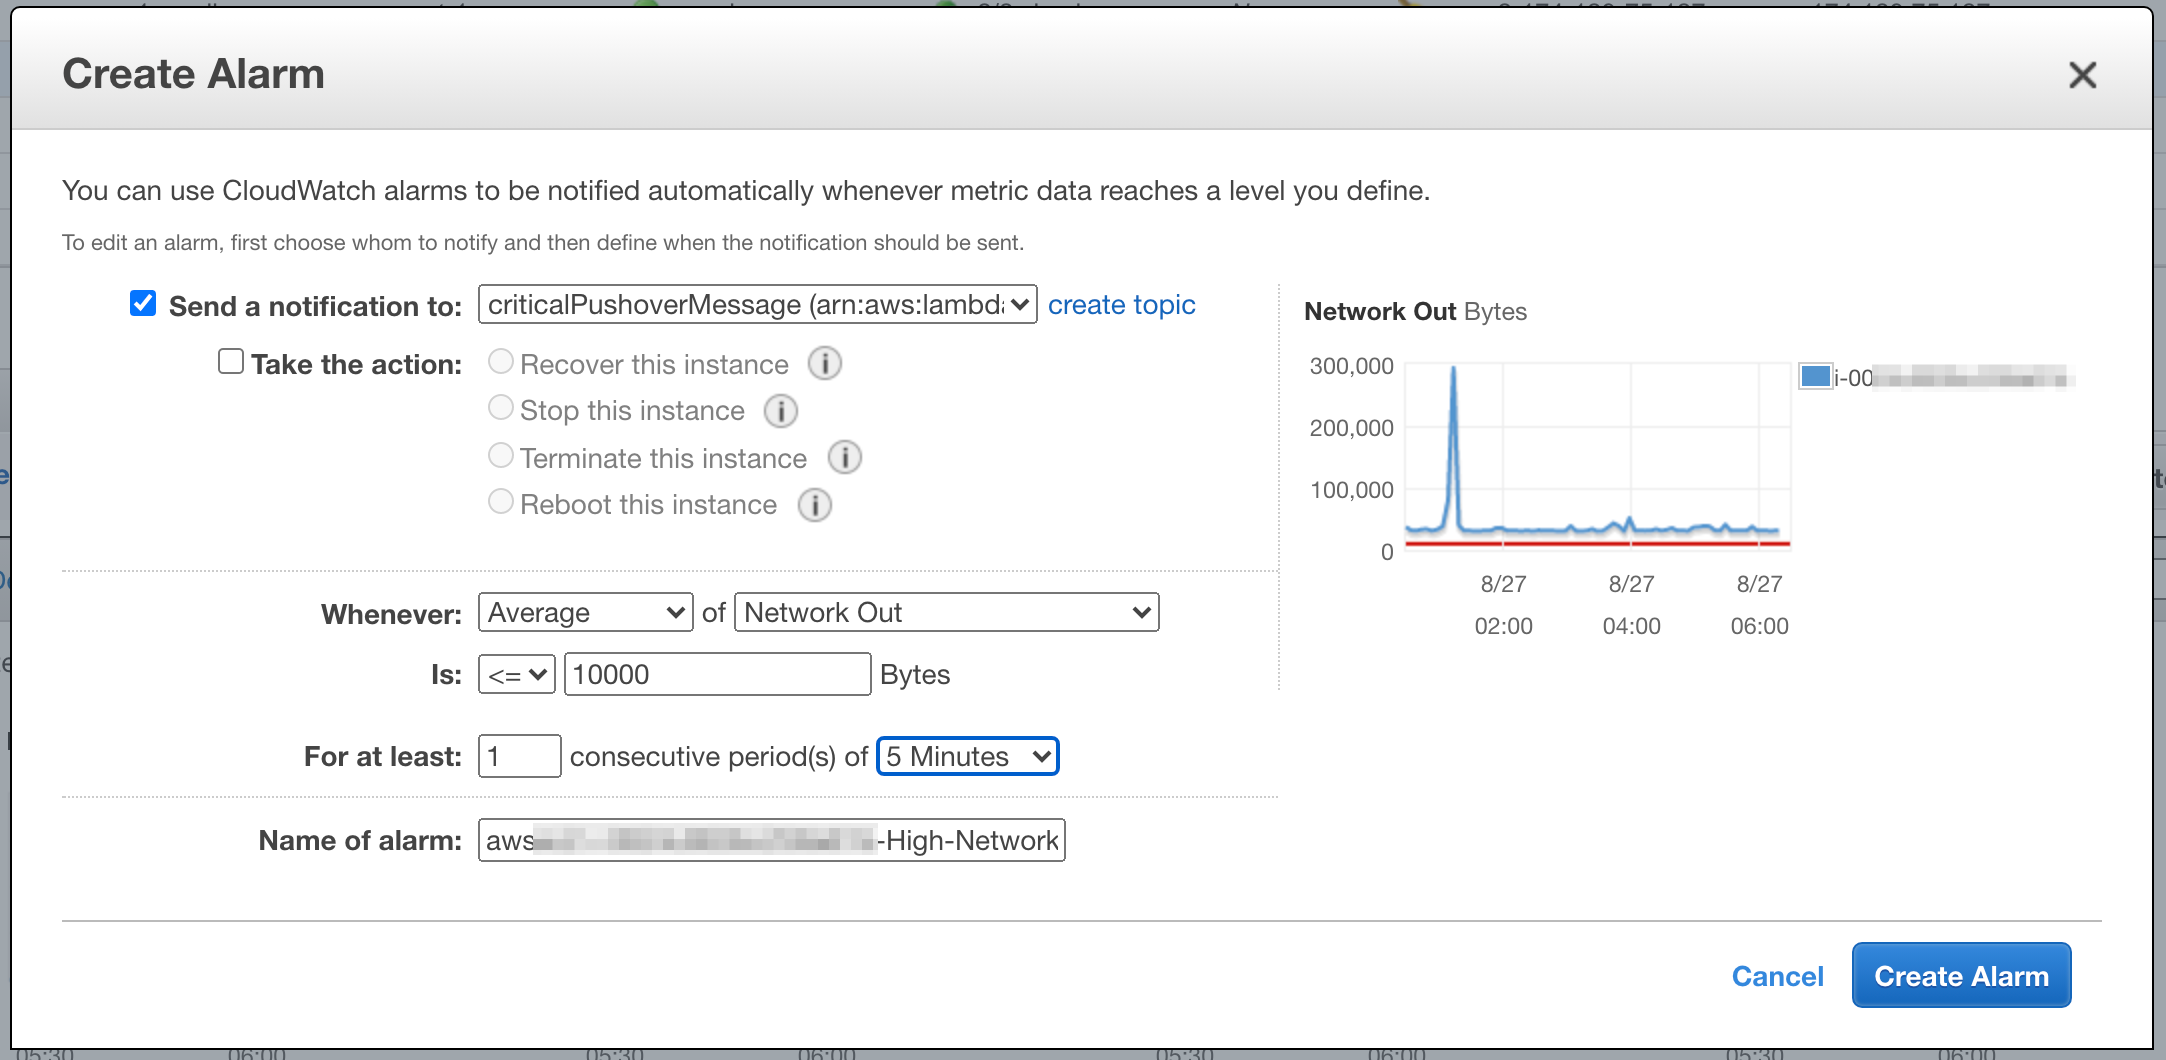
Don’t forget to choose the same SNS topic name we created earlier, then you can specify the parameters of the alarm. Here we want to trigger an alert when the Network Out falls below 10,000 bytes for a period of 5 minutes. That would usually mean the server has stopped responding to external requests for some reason.
Receiving Alerts
OK, we are all done. All we have to do is to wait until you have a server issue, then you should receive an alert like this:

The little red triangle next to the alert app signifies that this is a CRITICAL alert.
Note: The first time you receive a critical alert, you will be asked by iOS whether you wish the app to be able to send critical alerts. You have to answer ‘Yes’ to this prompt to receive future critical alerts.
Tapping on the alert should open Pushover where you can see more information on the error.

(Note that the red background denotes a critical alert!)
And further, opening up the alert will show you full details.
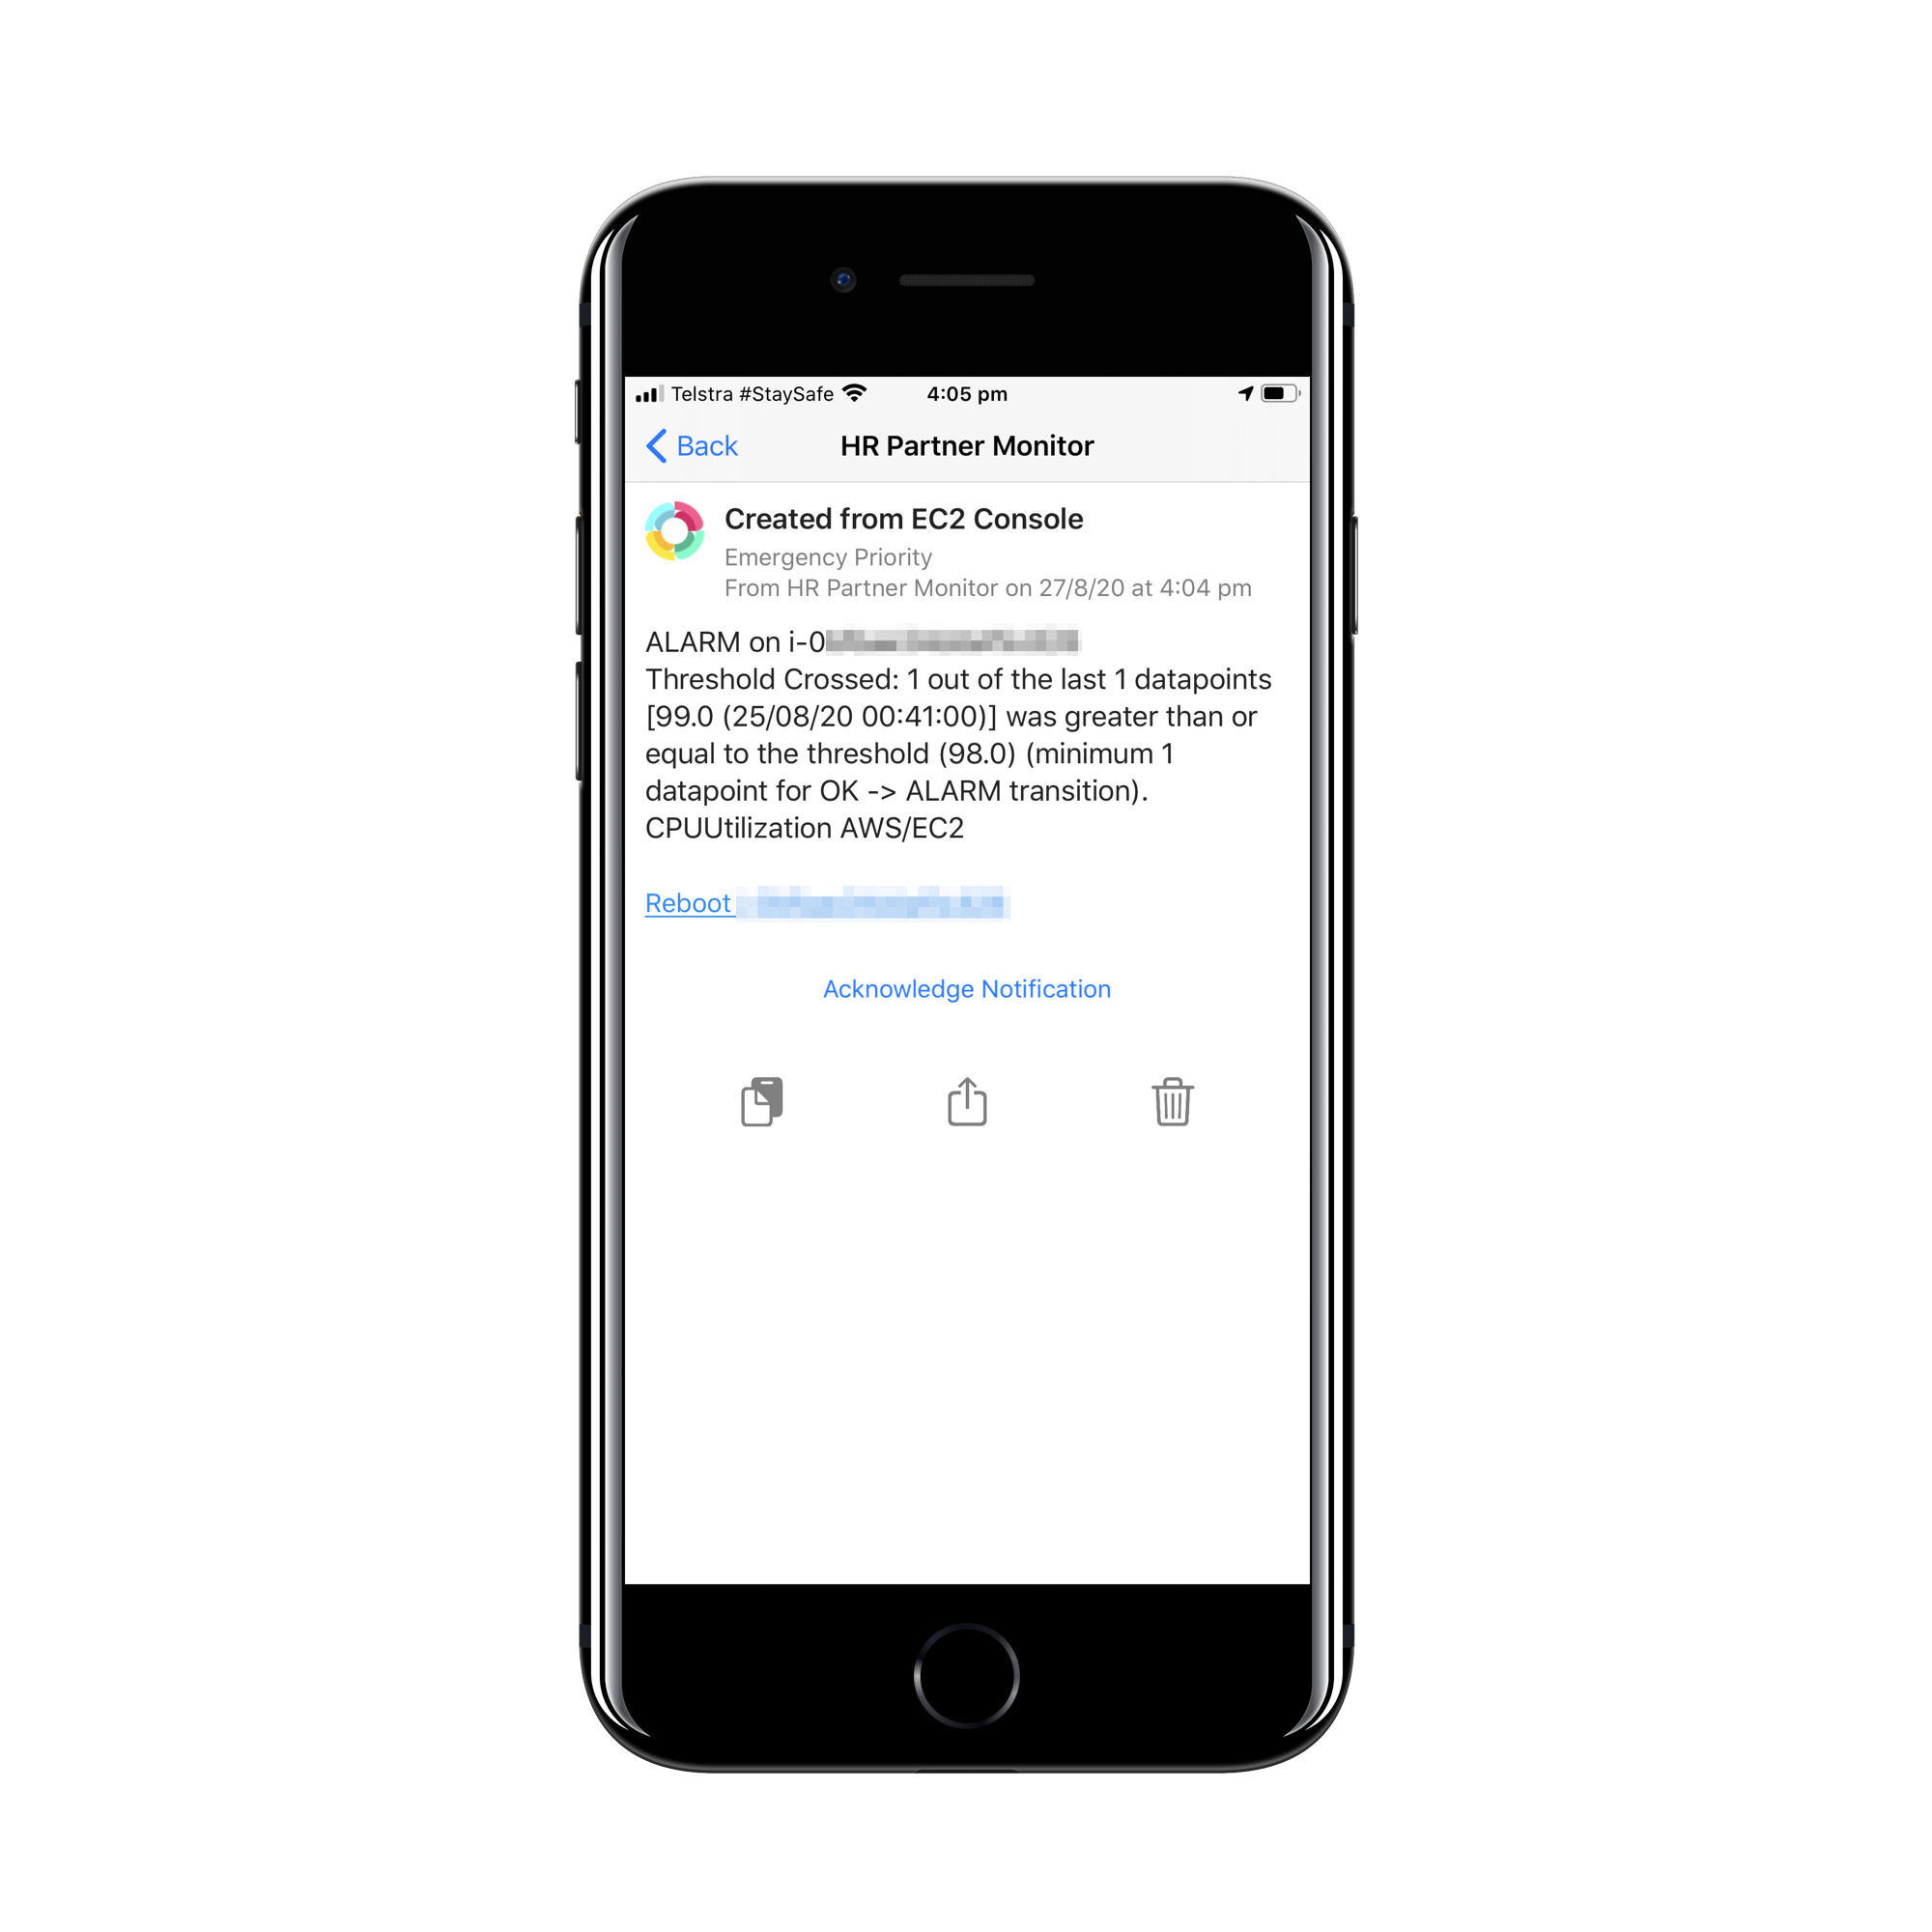
Note the link on the bottom of the alert which allows me to reset the server with just one tap. No need for me to even get out of bed to log into my AWS console in the middle of the night. I can get enough information to judge the severity of the alert, and I can choose to reboot the server right there and then to sort the issue out quickly.
Also note that there is a link to acknowledge the alert. This is because I set the alert in the Lambda function to be priority 2, so I have to acknowledge it or it will keep bugging me. If you don’t want to be constantly nagged, set it to priority 1 instead.
Conclusion
So that is it. I hope that this step by step tutorial is useful to you in setting up special alert notifications which will get through even if your phone is set to ‘Do Not Disturb’. Just be careful if you are out at a concert or a meditation camp where you truly don’t want to be disturbed. You can set notification hours within the Pushover app though, or even silence ALL notifications for ‘x’ minutes/hours, to further narrow down when you can be disturbed. Have fun!